Documentation
Tutorials
No Results Found
The page you requested could not be found. Try refining your search, or use the navigation above to locate the post.
Features
No Results Found
The page you requested could not be found. Try refining your search, or use the navigation above to locate the post.
Custom PHP Code
Accessible in theme files under: “Appearance > Theme File Editor”
Smart Inbound will occasionally add custom PHP (a coding language) to your website in a file called functions.php. PHP is related to the functionality of your website. Each piece of code will be properly labeled with the date it was added and its purpose. Be extremely careful making edits to your theme files.
Custom CSS Code
Accessible in theme files under: “Appearance > Customize”
Smart Inbound will occasionally add custom CSS (a coding language) to your website using the standard WordPress CSS editor. CSS is related to the look of your website. Each piece of code will be properly labeled with the date it was added and its purpose. Be extremely careful making edits to your CSS files.
Uploading Images
It cannot be overstated how important it is to resize, compress, rename, and SEO-optimize images on your website. It will take time to follow the initial instructions, but it becomes very efficient once learned.
Images that are too large in size (greater than 400kb) will slow down your website, damage your SEO, and increase your hosting storage fees.
There are multiple ways to add media to the website media library including the dashboard menu’s Media > Add New, but you will likely upload images during the process of creating new website content.
Before Upload:
1. Make sure the image is properly formatted, sized and compressed.
- ≤ 2000px max width
- < 500kb max file size
- Saved as a .jpg, .png, or .webp.
If so, skip to “After Upload.” If not, continue.
2. Use an image resizing tool such as Preview for Mac (Tools > Adjust Size) and adjust the size of the image to 2000px wide or less.
3. Save or export the image (Preview for Mac: File > Export) to a .jpg, .png, or .webp format.
4. Use a image compression tool and compress the image to under 500kb. If the image is still too large, try exporting it to the smaller .jpg format (unless it needs a transparent background). You can also try .webp, which is an optimized image format made for using online.
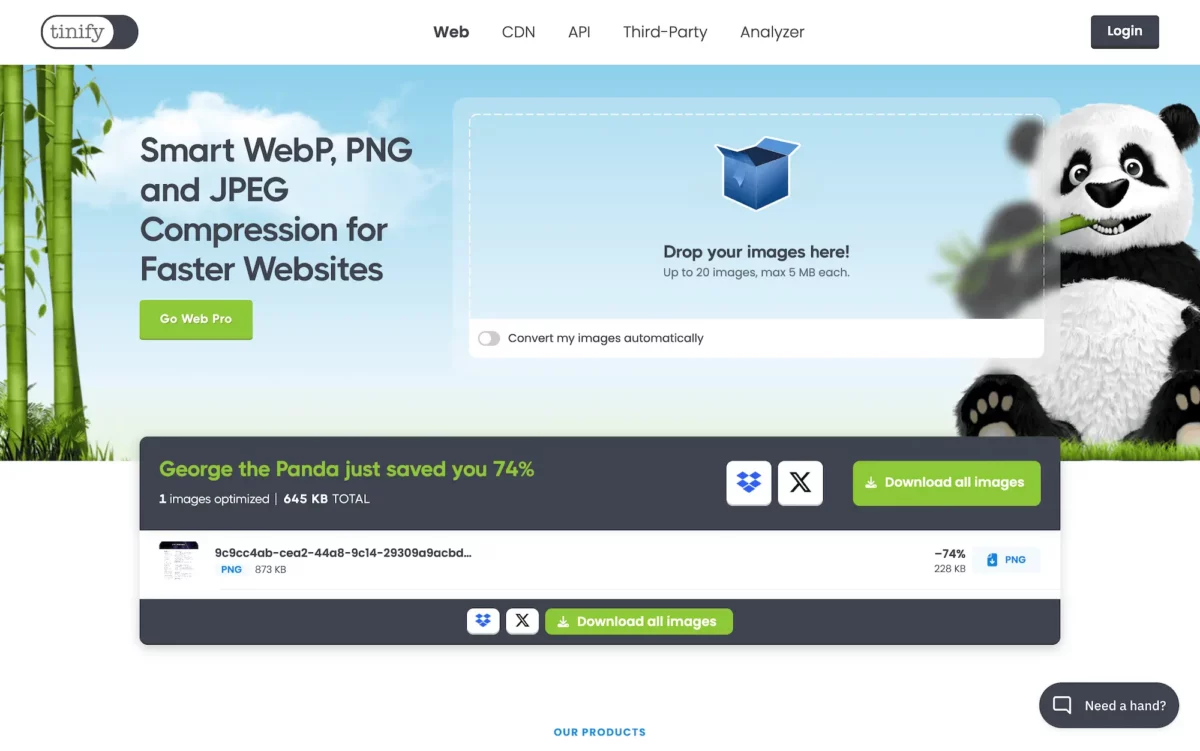
- Free online compression: TinyPNG
- Free Mac app: Image Optimizer
- Free PC and Mac app: Caesium
- Free online .webp converter: FreeConvert
There are also paid WordPress plugins that can perform image resizing and compression for you. Discuss with Smart Inbound if you would like to explore these options.
5. Change the file name to something descriptive, searchable, and helpful for search engines, such as:
- wells-fargo-online-banking-smiling-teller.png
- john-deere-tractor-exterior.jpg
- smart-inbound-documentation-image-compression-example.webp
Avoid image titles like home-page-header.png, screenshot-00-00-00.png, or IMG_1234.png as they are not helpful for SEO or other website managers to find in the media library.
After Upload:
6. Upload the image into the media library. Some common methods include:
- Selecting the “Add Media” button in the WordPress backend text area of a blog post
- Selecting “Add Image” inside the frontend visual builder’s image module
- Typing “/image” on a blank line inside the WordPress backend block editor
- Drag and drop a properly formatted and compressed image into the WordPress media library
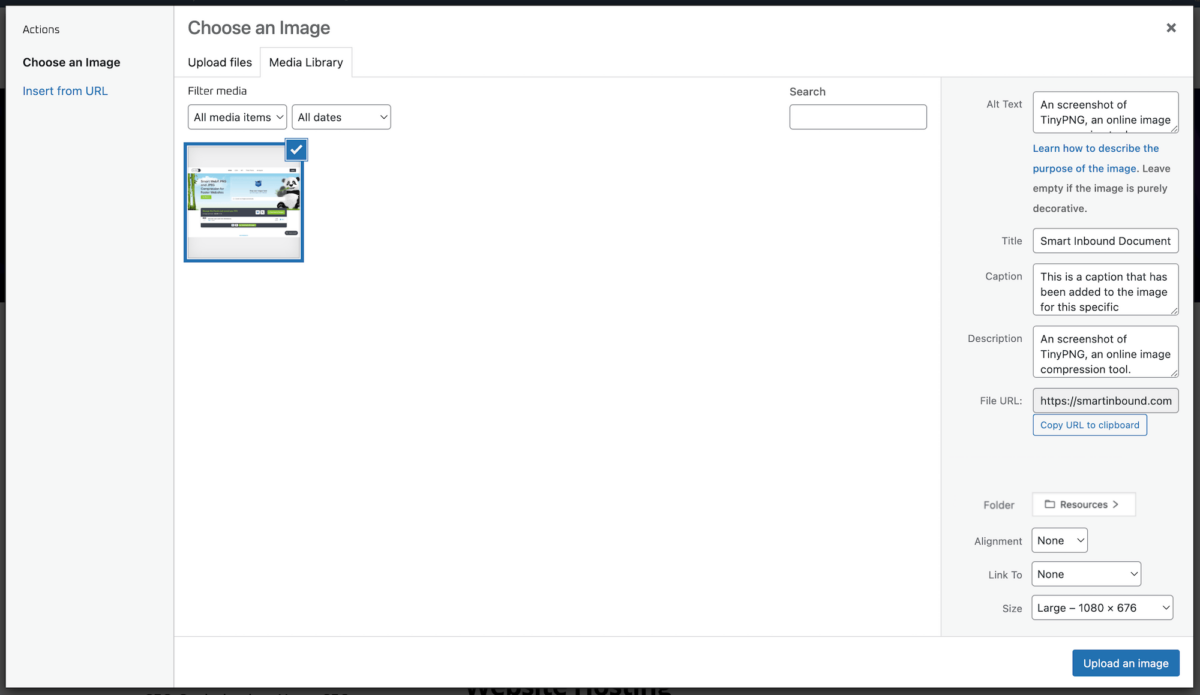
After an image is uploaded, use the “Attachment Details” column to fully optimize the rest of the image information.
7. Enter an alt tag for the image. Alt tags are important for SEO and also help screen readers describe the image to users. Alt tag should be helpful first, and keyword-centric second.
- “A smiling Wells Fargo teller using the online banking app.”
- “The green exterior of a John Deere tractor in a field.”
- “A screenshot of TinyPNG, an image compression website.”
Alt tags should also describe functional images, for images such as logos or icons:
- “The black and white company logo.”
- “A light bulb icon.”
- ” A ‘Contact Us’ image button.”
8. You may want to reformat or rename the title, but it is likely auto-generated from the properly named file. It is not important to SEO, but it can help you stay organized.
9. You may want to add a caption to the image before it is placed on the page. Captions may or may not be visible, depending on its placement. The caption you write can be changed each time you place this image on a page.
10. You may want to copy the alt tag into the description. The description is only used in some cases, but it could be relevant to SEO if so.
11. Select the best folder for this image, if you have folders available. This will help all backend website users quickly find past images, and reduce the chance of re-uploading the same image multiple times.
12. If you have the option, select the smallest possible image size for your use case. Upon every upload, WordPress duplicates and resizes the image into four sizes: thumbnail, medium, large, and the original full size. Using the full-size image is usually necessary for fullwidth backgrounds, but it will almost certainly harm SEO if used inside post or page content.
13. Review the information and select the Upload Image or Set Image button when ready.
Finished Example:
Below is an embedded .webp image that has been resized, compressed, and properly labeled. It is only 85kb at full-size, and just 40kb using the medium size below.
Here is an example of an uploaded image with all of the attachment details added:
Adding Posts
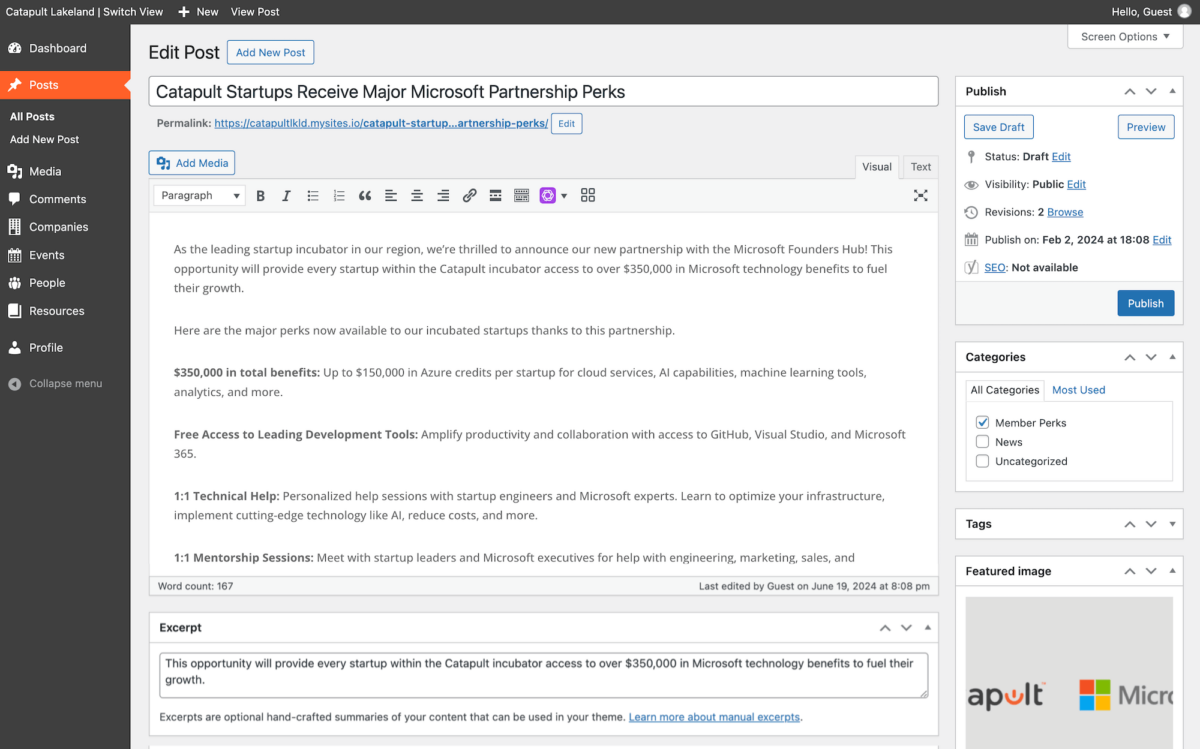
1. Use the Dashboard menu to select Posts > Add New Post.
2. In the title text field, write the title of your post.
3. In the body text box, add the text and media that makes up your post.
4. In the categories selection box, select the correct available category(s) for the post.
5. In the tag addition box, add any relevant tags (if you are using tags).
6. In the excerpt text box, enter two to three introductory sentences about the post.
This will be used for post previews around the website and in search results.
7. In the featured image box, upload the properly labeled, formatted, and compressed post image.
Learn how to properly label, format, and compress images here.
8. Based on your platform, there may be additional boxes with required information.
In the publish box, save your draft or confirm your visibility settings and publish the post.
Here is a general example of a completed post:
Editing A Page
Smart Inbound gives you full administrative and design access to your website. Your team may want to make design changes. Please note that each page on your website was carefully designed with the same fonts, spacing, and colors. As your team makes edits over time, the website design quality can begin to degrade.
You can edit any page on your website using the Divi Builder tool. The best way to learn the Divi Builder is by reading the documentation provided by Elegant Themes:
https://www.elegantthemes.com/documentation/divi/visual-builder/
Here is a quick overview to get you started. While logged in and viewing any page, select “Enable Visual Builder” in the top menu:
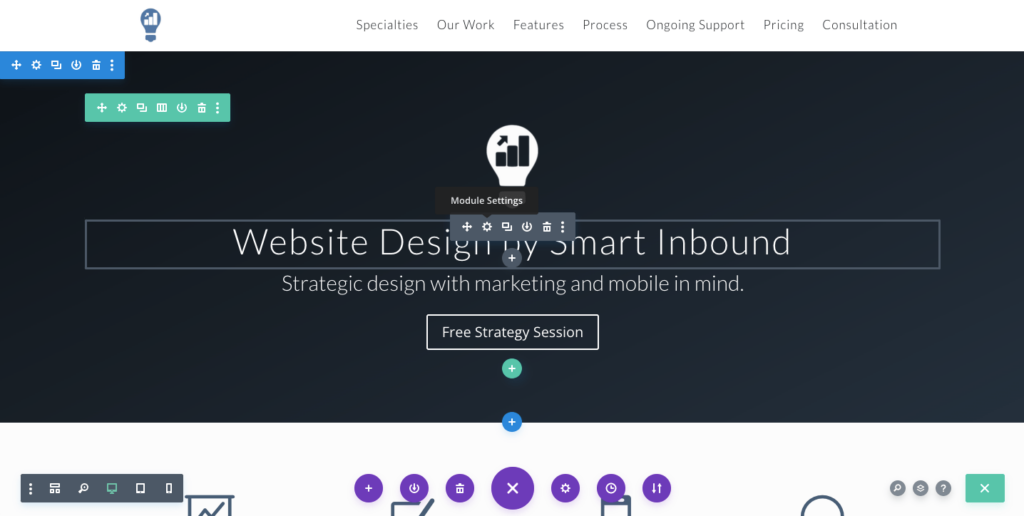
The Divi builder uses sections, rows, and modules.
Sections contain rows and modules. They control the background image and color, as well as spacing between other sections.
Rows contain columns. You can usually select between one and six columns. Rows can also have their own spacing and backgrounds.
Modules make up the content on your website. There are texts, images, icons, contact forms, and dozens more.
You can usually edit any section, row, or module by hovering over it and selecting the gear icon for “Settings”. Here is an example of the settings for an image module:

Inside the content tab, you can select the image, add a link, change the module background, and more settings based on the module you’ve chosen.
Inside the design tab, you can select the image size, spacing, color gradient, animations, and much more.
Inside the advanced tab, you can add custom CSS, IDs, and classes to the image.
Make sure you select the green checkmark to save your work with every module you edit.
When you have completed making your page changes, select “Save” in the bottom corner of the screen. You may have to select the three purple dots to expand the menu.
You can use the same menu on the bottom left to view your website in tablet and mobile view. Each module may have custom settings for every screen size, so you will need to adjust accordingly.
Support and Changes
Your website will be delivered to you in perfect working order. Once a company starts to make edits and plugins begin to release updates, we can no longer guarantee perfection. Here are the options for support and updates.
Ongoing Support For Smart Inbound Work Only:
Included with Smart Inbound Hosting for $50 / month
All websites require updates and active management to remain functional and secure. Smart Inbound uses various tools to update and optimize your website on a monthly basis. This includes smart plugin updates, Spam removal, critical security updates, and bug fixes related to our work.
How support works:
We will check in with your site each month to make any necessary updates.
If you discover a website issue in the meantime, email support@smartinbound.com.
If the error is related to our changes, our standard plugins, hosting, theme updates, or our custom-written code, it will be fixed as soon as possible.
If the error is related to client changes, additional plugins, the WordPress ecosystem, or any outsourced development, Smart Inbound provides email support and may be able to offer a solution for an additional cost.
Design and Content Updates or Client Bug Fixes:
Available for $100 / hour
If there is a new content or design project that you would like to hand off to Smart Inbound, we will quote out these projects and receive approval through email.
Changing content or small design elements are fast 15-minute updates. Adding new features or additional pages may require multiple hours.
If the client has made design changes or added additional plugins that have caused an error, Smart Inbound will clock in to fix these issues upon request.
You will receive a quarterly invoice with clearly labeled hours sorted by project.
Custom Plugin Development Issues:
Available for developer rate and Smart Inbound project management fee of $100 / hr
We may decide together to create a custom plugin with a developer. Although this can take your site to the next level, it comes with some risks. The custom plugin will not have regular updates, potentially leaving it vulnerable to attack or bugs as the rest of the WordPress system evolves. The developer may exit the industry and be unavailable.
Smart Inbound will manage the initial custom development project and keep the developer’s contact details. If the custom plugin breaks, Smart Inbound will get a quote from the developer for a fix (which may be free, depending on the developer’s policies). If the developer is no longer in business, Smart Inbound may be able to source and quote another solution.
Managing Products
If your platform has eCommerce capabilities, you may want to add or update products.
1. Use the dashboard menu to navigate to Products > All Products.
Here you can add a new product or edit a current product. You can also see information such as stock levels or sort by various columns:
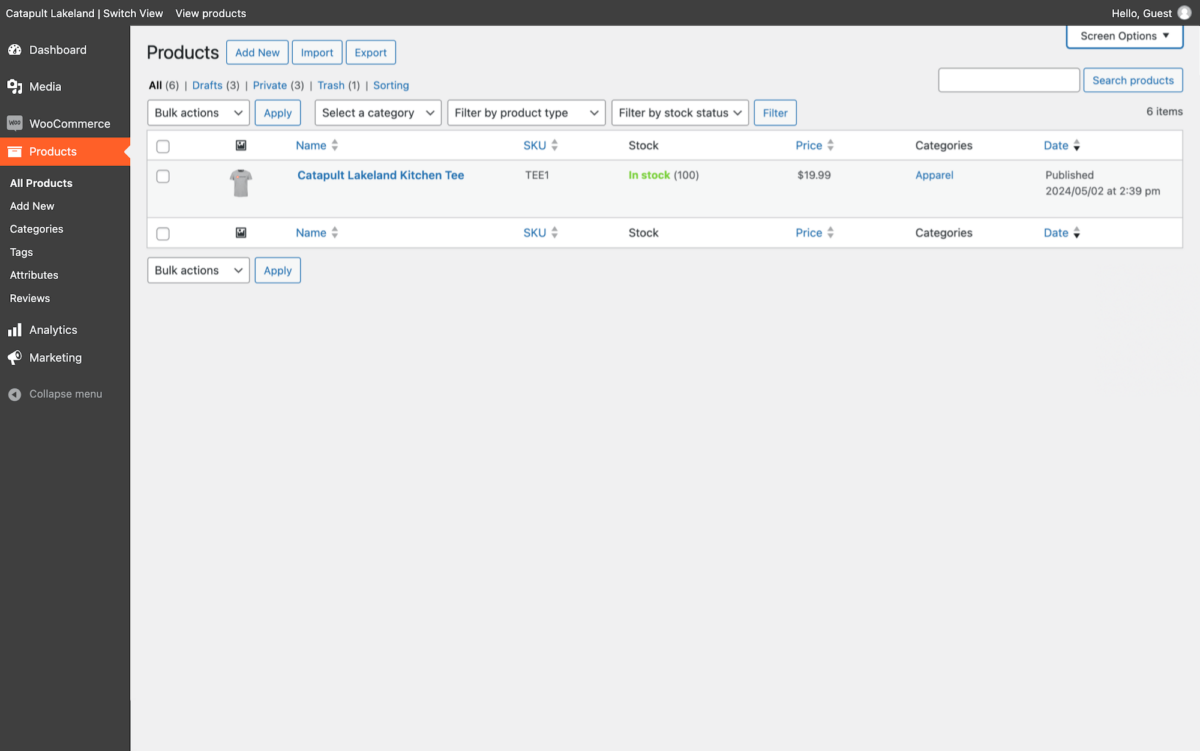
2. Navigate to Products > Add New or hover over a current product and select Edit.
Whether you are adding or editing a product, the fields you will interact with are the same. This tutorial will help you add a new product, which will familiarize yourself with all of the settings.
3. In the title text field, write the title of your product.
4. In the product description text area, write the detailed description about your product.
This might include an introductory paragraph, bullet points regarding product features, testimonials, and more. This information will be displayed below the product images, price, and add to cart button. You will place a shorter product description in another text area that will display above the fold directly next to the product images.
5. In the product data box, select the type of product.
- Simple products do not have any variations for the user to select based on attributes like color and size. Examples include a coffee mug or a sticker.
- Variable products have variations based on any attribute. The most common attributes are color or size. Any time your product has multiple options of any kind, you can create an attribute and add the different variations for the user to select.
- Group products, external products, and bundles are other product options but are not as popular.
- Virtual and downloadable products will remove inventory and shipping options while adding links for the purchaser to download.
If you selected a simple or variable product, the following action steps are the same.
6. In the general tab: enter the standard product price, tax status, and tax status (almost always taxable and standard).
You can add a sale price and timeline to this product instead of adjusting the standard price. This will activate a “Sale!” banner on the product image.
7. In the inventory tab: enter the product SKU (must be unique), the stock status, and potentially the stock number.
Select “Allow backorders?” if you would like users to be able to place orders while the product is out of stock.
8. In the shipping tab: enter the weight of the product and the shipping dimensions for the product.
For hard items like a coffee mug, the product dimensions and the shipping dimensions are the same. For soft items like a tee shirt, the shipping dimensions of the rolled-up shirt will be much smaller.
Your eCommerce platform uses these shipping dimensions when calculating live shipping rates (if that feature is activated).
9. In the linked products tab: add any up-sells or cross-sells. Products you link here will be shown in various places when the current product is in the user’s cart.
10. In the attributes tab, add any product attributes that will be used for descriptive purposes or to activate different product variations.
For single products:
You can optionally add single attributes such as Color: Black. These are displayed below the product description and can be helpful for the shopper, but are not used for any additional purpose.
For variable products:
This tab is where you will enter the name and values of different attributes that will create product variations. For instance, Size: Small, Medium, Large. Or, Color: Black, White, Red. Make sure you select “Use for variations.”
If you have already created these attributes on other products, you should add them from the “Select existing” dropdown. This means they are “global” attributes, and can be connected to each other. If you ever change the attribute value label Black to Midnight Black, the global attribute label will change everywhere (including all of the products currently using it).
11. For variable products only, in the variations tab:
You most likely want to generate variations automatically. If you have three sizes and three colors, that means you have nine variations. Once your variations are generated, you will need to add information to each. The information in these variations will override the information in the general tab, because these are technically each a seperate product.
Expand each variation to add a unique SKU, the correct image, and a price for each variation. If managing stock, you will also set the stock amount for each variation.
12. In the product short description text area: enter a condensed version of the product description.
13. In the product image tab, add the properly formatted and compressed primary image for the product. This will be the image shown in the shop and when the product page is first loaded.
Learn how to properly label, format, and compress images here.
14. In the product gallery, add additional images that the user can scroll through. This might be different angles of a single product or the different featured images for variations (a user will also see the variation featured image when it is selected, but it is not in the product gallery by default).
15. In the product categories box, add the category(s) of the product.
16. In the product tags box, add any relevant tags (if you are using tags).
17. Based on your platform, there may be additional boxes with required information.
18. In the publish box, save your draft or confirm your visibility settings and publish the post.
Here is an example of a completed variable product:
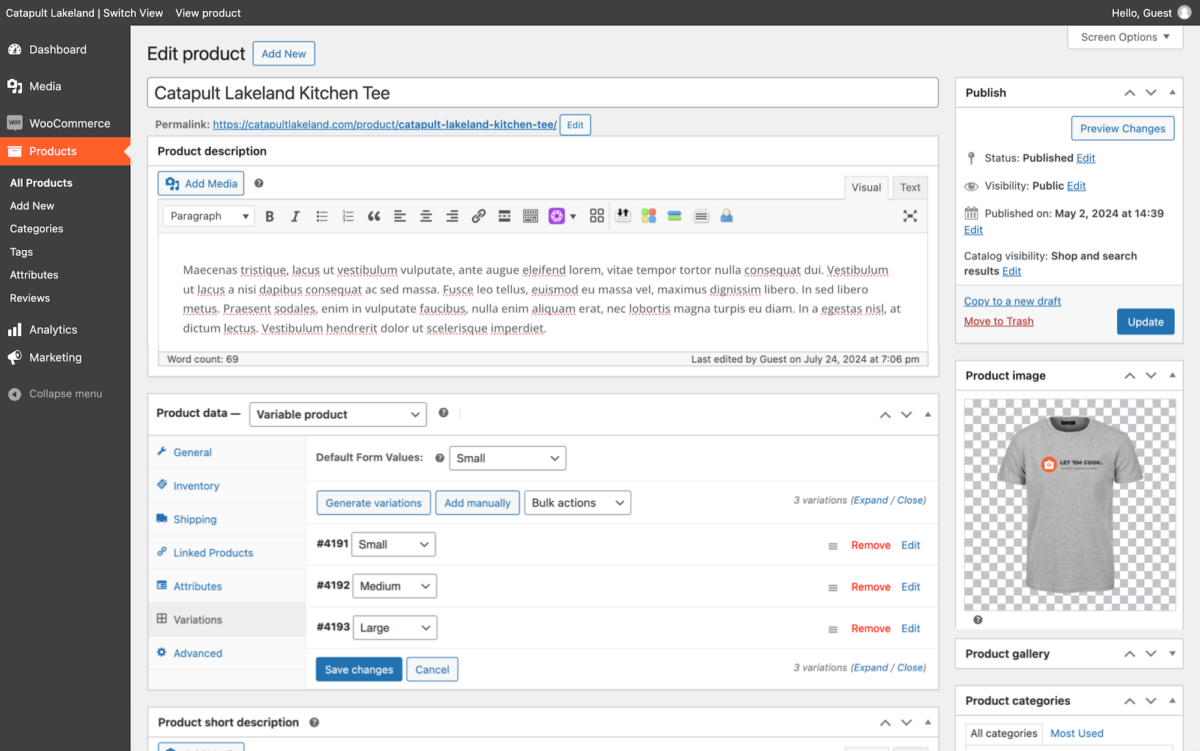
To add / edit categories or global attributes, use the Products > Categories or Product > Attributes menu.
Formatting Logo Images
You may be showcasing logos of other companies on your site. In order to make logo bars or logo directories look their best, it is important to standardize each logo image.
1. Source the highest quality initial logo image possible. Use Google images to search for “company-name logo” and filter by the largest available size.
Some logo images are in PNG format, which may mean they have a transparent background. This is best for logos, but not all companies have that transparent format available. For consistency, it is often easiest to display logos on a white background.
2. Standardize the proportion and presentation of each logo. If you do not use any photo editing tools, you can easily use Keynote, Powerpoint, or Google Sheets to build a template you can reuse.
– White (or ideally transparent, if available) image background
– 2:3 image proportion (400px by 600px, for example)
– Approximately 5% white space between the logo and it’s closest image border
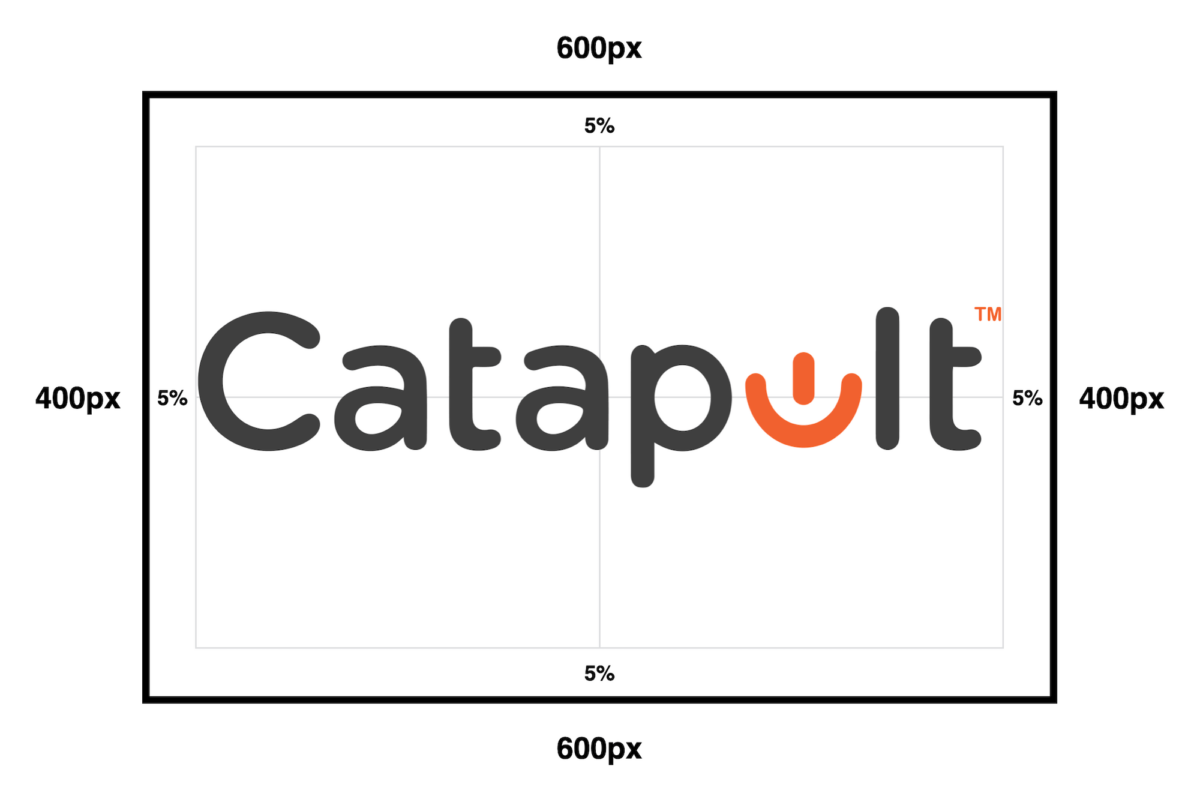
3. Save the image in a proper format.
– WEBP or JPG for logos with a white background
– PNG for logos that require a transparent background
4. Name the image following a standardized naming convention.
– company-name-logo.jpg
– company-name-logo-grayscale.jpg
– Etc.
Next, learn how to properly upload images to your image library.
Adding A Company
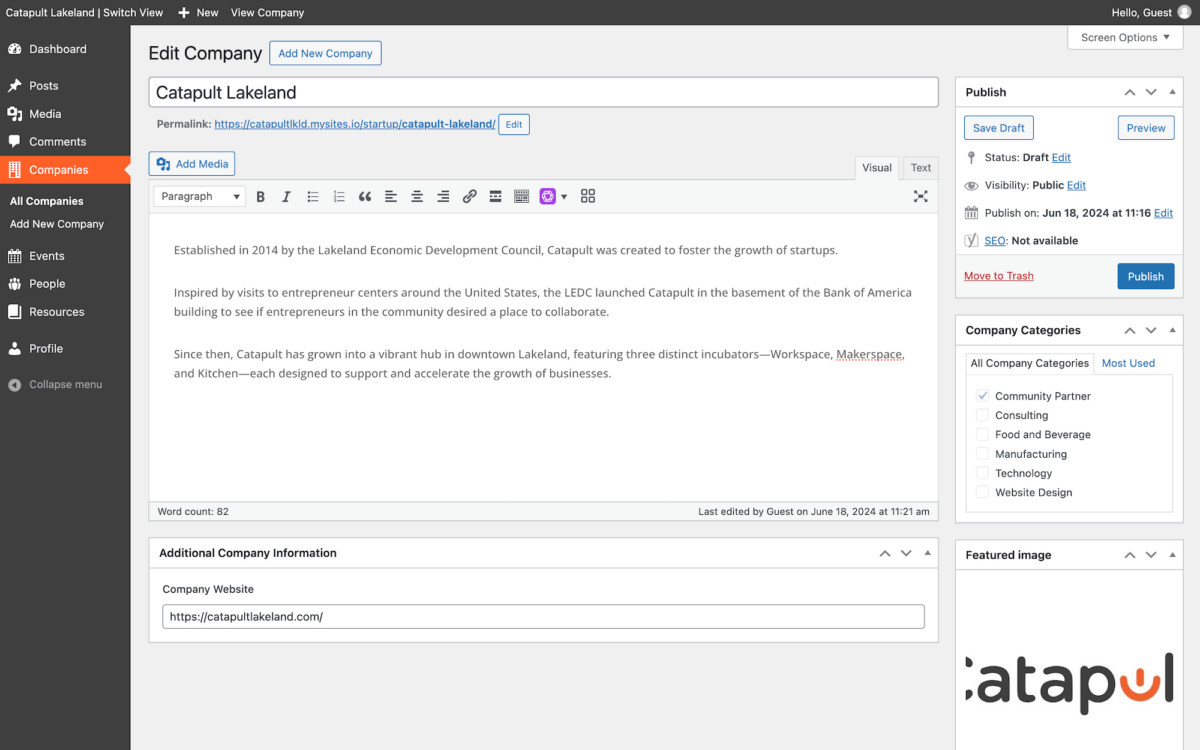
1. Use the Dashboard menu to select Companies > Add New Company.
2. In the title text box, add the full name of the company using their spelling and formatting guidelines.
3. In the body text box, add the biography of the company and any additional information.
4. In the company categories selection box, select the correct category for the company.
5. In the featured image box, upload the properly labeled, formatted, and compressed company logo image.
Learn how to properly design a logo image for a company directory here.
Learn how to properly label, format, and compress images here.
6. In the company website text box, add the website URL of the company.
7. Based on your platform, there may be additional boxes with required information.
8. Review all of the company information, and then select Publish.
Here is a general example of a completed company:
